Product applicability
| Product Type | Constrictor Wire Cored Conductive Rubber Electrode |
| SKU Codes | i 3x1, i 3x2, i 3x3, i 3x4 |
Materials And Design
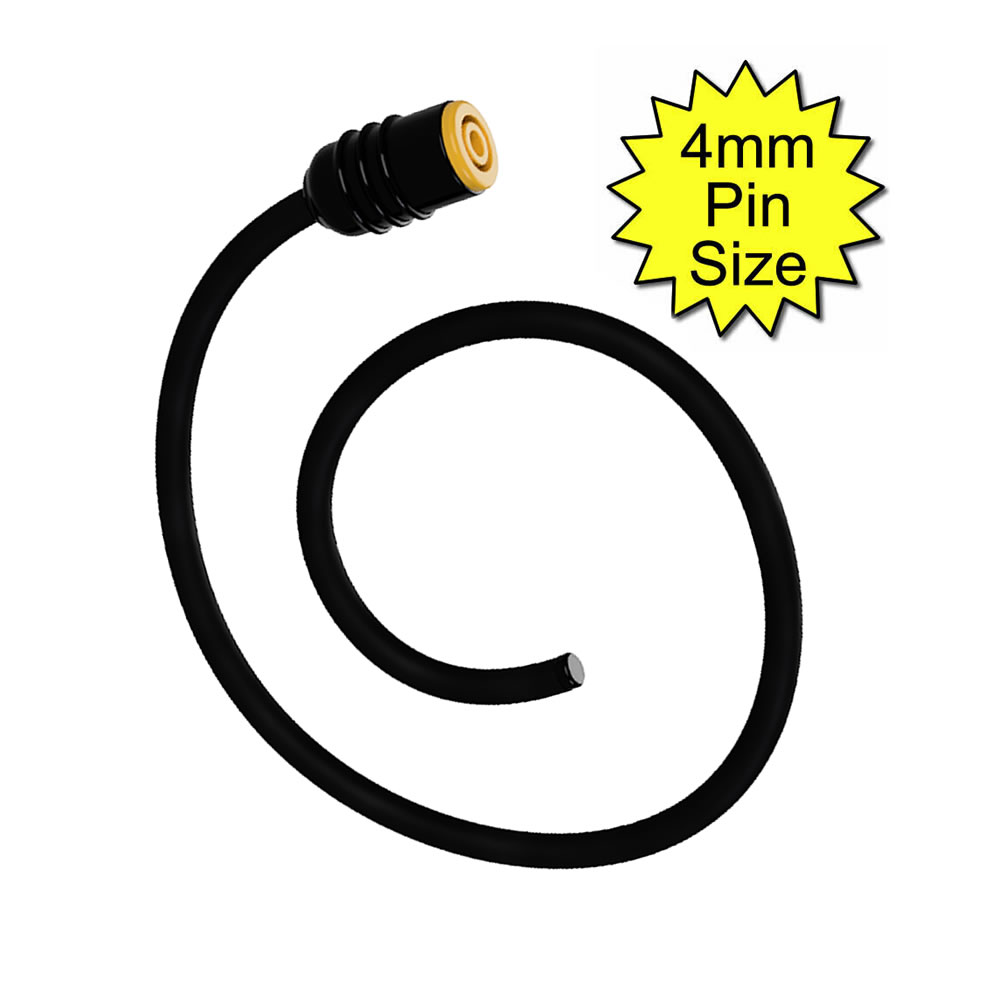 These conductive rubber electrodes are made from several body-safe materials. They are made from high-quality British conductive rubber with copper wire running inside. This provides excellent sensations due to the extremely low resistance of the copper wire and conductive rubber combination.
Conductive rubber (a silicone elastomer) is created with carbon particles suspended within the silicone blend; this carbon element turns silicone into conductive silicone.
In use, some black residue may be seen on your fingers or other body parts; this is normal and a result of outer layers of carbon shedding due to stretching and flexing.
This electrode ends in a 4mm banana socket, which gives a sturdy connection point.
General Safety Considerations |
| DO NOT CONNECT ANY ELECTRICAL DEVICE TO ANY LOCATION ABOVE THE WAIST (ACROSS THE ARMS COUNTS AS ABOVE THE WAIST!), BUT ESPECIALLY DO NOT CONNECT ACROSS THE HEART (FRONT TO BACK, OR SIDE TO SIDE), CHEST, NECK OR HEAD. DO NOT USE IF FITTED WITH A PACEMAKER OR OTHER ELECTRONIC MEDICAL IMPLANT, ARE EPILEPTIC, OR ARE, OR MAYBE PREGNANT. REMEMBER YOU USE THIS DEVICE AT YOUR OWN RISK. |
Instructions For Use
Fitting
You must ensure that your control box is switched off and power level knobs are set to their minimum position before fitting electrodes! A second electrode will need to be used to create a circuit when using a monopole electrode.
- Attach one of your channel plugs to one end of the conductive rubber tubing. Note: Only fit one plug from a channel into each electrode, or you will create a short. This will mean you do not feel anything. You also risk damaging your control box if you create a short in this way.
- Apply conductive gel/lube to the contact surfaces touching your skin.
- Wrap the electrode around the preferred contact point and adjust the conductive rubber to achieve a snug fit. If needed, apply extra conductive gel during your session.
- Turn on your control box and adjust your controls.
- Enjoy and adjust the fit of your electrode during the session if required.
Removal
- Ensure the output of your control box is set to zero, and ideally, switch off the control box before removing your electrodes.
- Unplug your cable, loosen your electrode and remove it.
- Wipe down the electrode to remove excess conductive gel.
Cleaning
Wash in warm, soapy water and dry the electrode before storing it until your next session. The conductive rubber can be removed to aid cleaning, but when refitting it, use a push-pull action to minimise stretching of the conductive rubber. Do not use abrasive or caustic materials on the conductive rubber or plastic components.
Maintenance
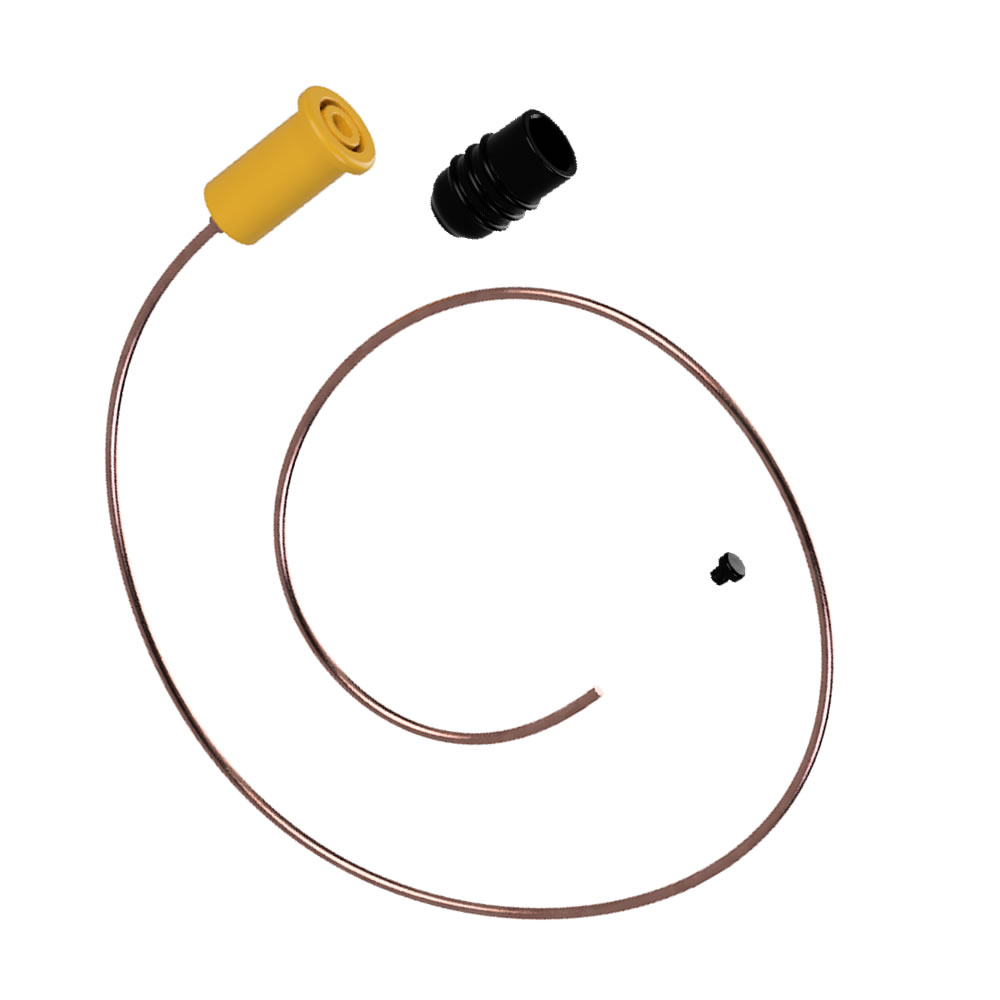 This electrode has been designed to allow quick and easy maintenance should any part wear out. If you damage the conductive rubber or wire inside, you can strip the electrode in the following way:
- Remove the small plug at the end of the electrode and save it for fitting later.
- Gently ease the 4mm banana socket up and out of the black housing. Once loose, slowly remove the socket, pulling out the copper wire.
- The conductive rubber is an interference fit with the black socket holder; gently pull on it to remove it from the holder.
- The copper wire is soldered into the base of the 4mm banana socket. You can change the wire using a soldering iron to unsolder and replace the copper wire. The copper wire is 1.5mm in diameter.
Reassembly
- Insert the conductive rubber into the base of the socket holder, pushing and twisting it. When fitted correctly, it should be flush with the inside face.
- Insert the copper wire through the opening in the socket holder and into the conductive rubber. Gently push the wire through the conductive rubber. The socket will slide into the holder, stopping about 2mm from being completely inserted. Push and twist the 4mm banana socket until fully inserted into its holder.
- Replace the small plug into the end of the conductive rubber.